> ## Documentation Index
> Fetch the complete documentation index at: https://docs.famulor.io/llms.txt
> Use this file to discover all available pages before exploring further.
# Web widget
> Embed your assistant as a voice and chat widget on any website
The web widget puts your assistant on your website: visitors click a button and **talk to the assistant in the browser** (no phone or app required) or type in a **chat** with the same assistant. The widget is available when included in your plan.
## Voice + chat, one assistant
* **Voice** — a click starts a live voice conversation using the assistant's full configuration: engine mode, voice, knowledge base, tools, guardrails. During the session, the panel keeps the presence visual large and shows the latest spoken words in small caption groups; the full transcript remains available in [History](/monitoring/history), where web calls use direction `web`.
* **Chat** — the same assistant, prompts, and knowledge base in text form, for visitors who can't or won't speak.
Because both channels share one assistant configuration, you maintain behavior in one place.
## Visitor languages
All standard widget controls, form prompts, verification screens and error messages support 86 languages. The visitor’s preferred browser language is used first. Country detection supplies a fallback; English is used when no supported language can be determined. Right-to-left languages use a matching layout.
Your own greetings, assistant names, edited field labels and other custom text stay exactly as written. Conversation content is not translated by the widget. The security challenge uses its own supported languages.
## Embedding
Create a widget under **Settings → Channels → Web Widget**, then paste a snippet from the editor. Choose **Display**:
The default — a corner launcher bubble. Position and Initial state apply. Prefer the **script** loader (it sets `allow="microphone"` on the iframe automatically):
```html theme={null}
```
The widget sits in your page flow (no launcher). Prefer the web component or iframe snippet (portrait sizing included for avatar cards):
```html theme={null}
```
Or mount into a target node: `data-widget-target="#voice-assistant"` on the script tag.
The **Install** tab of the widget editor has ready-made HTML and React snippets plus a prompt for AI coding agents. The examples below use supported widget attributes; use the editor for the complete snippet matching your configuration. On white-label domains the widget is served from **your tenant domain** with your branding.
Snippets that use earlier attribute or element names keep working; there is no need to replace them.
## Allowed websites
List the website(s) that may embed the widget (exact origins like `https://example.com`, or subdomain wildcards like `*.example.com`). Localhost is supported for development. Origins are **optional** when creating or saving a widget.
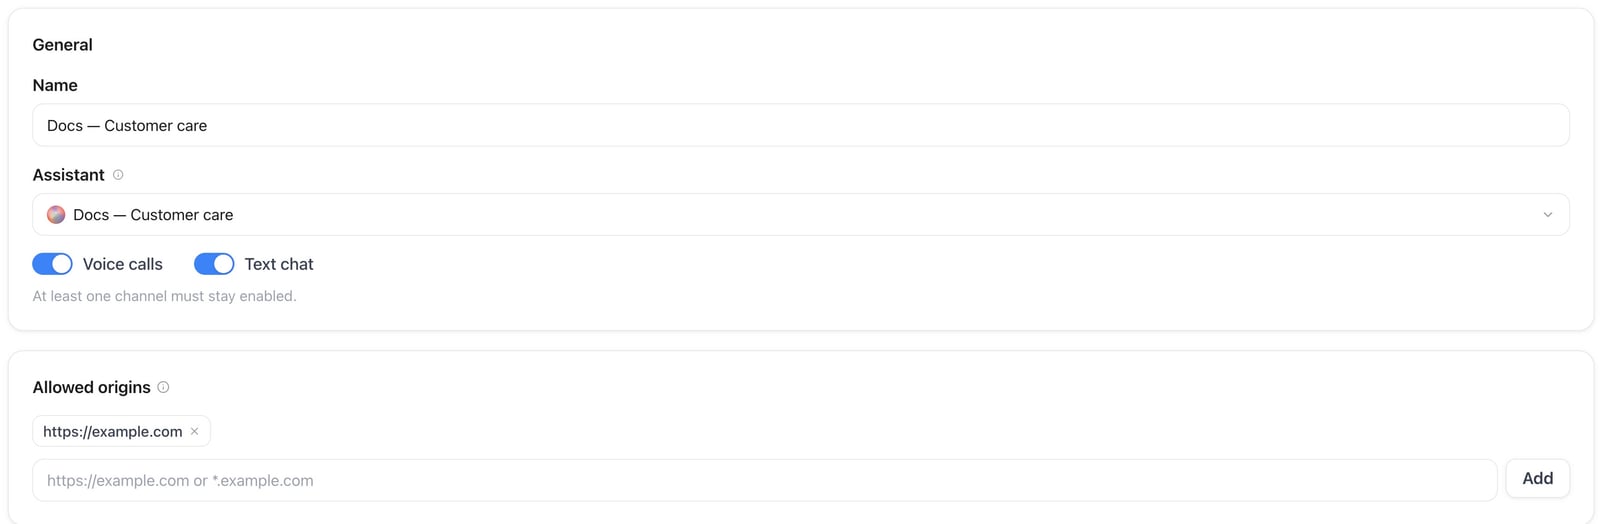 * An empty allowlist does **not** mean “open to any site”: foreign origins are blocked. Only the platform domain itself stays allowed so the in-app live preview keeps working.
* Add every website host that will load the snippet before going live. If the widget fails to load on a customer site, check Allowed websites first.
## Customization
* **Display** — **Floating** (corner launcher) or **Inline** (in-page embed). Position and Initial state only apply to Floating.
* **Colors and branding** — launcher color, panel accent, logo; tenant branding applies automatically on white-label domains.
* **Position** — corner placement of the floating launcher (hidden for Inline).
* **Modes** — voice-only, chat-only, or both.
* **Voice presence** — classic audio visualizer, or a **virtual AI avatar** (see below).
* **Launcher icon** — Assistant orb, Chat bubbles, Question mark, Smiley face, Team, or Hand wave. Applies to chat-only, voice-only, and both. **Assistant avatar** is also available when the selected assistant has a profile picture. **Logo** uses the widget header logo.
* **Launcher label** — presets (**No text** default; Help, Ask anything, Assistance, Support, Live Chat, Need help?) translated from the visitor’s browser language. Avatar-only still uses optional custom launcher text for the glass CTA.
* **Texts** — welcome message, AI disclosure, privacy notice.
* **Pre-chat form** — optional form before chat or voice starts (see below).
## Virtual AI avatar
Virtual avatars require the AI Avatar feature. In the widget editor, set **Voice presence** to **AI avatar** and pick an avatar.
* **Layouts**
* **Avatar only (full-bleed)** — compact card focused on the face. Floating widgets can start **Expanded** or **Minimized**; Inline always shows the card in place.
* **Avatar + chat** — avatar presence with the classic chat/voice panel chrome.
* **Billing** — voice sessions bill the normal talk-minute rate, plus the **Web widget virtual avatar** surcharge per minute while a virtual avatar is active; plain text chat messages sent and received bill credits per message at the workspace's **Web chat (sent)** / **Web chat (received)** rate. Current rates are on the [Usage page](https://app.famulor.io/usage); see also [How usage is billed](/billing/minutes).
* Without AI Avatar access, the editor shows an upgrade option and the API rejects enabling avatar presence.
## Pre-chat form
Open the widget in the editor, go to the **Messages** tab, find **Pre-chat form**, and turn on **Enable**. Visitors then fill in fields before the session starts.
* **Suggestions** come from contact fields (name, email, phone), the selected assistant’s input variables, and workspace Audience attributes. You can also add custom keys.
* Submitted values become call **input variables** (`{{variable_key}}`), update the Audience lead when identity fields are present, and appear in **History** under Pre-chat form / Input variables.
* Required fields are validated before a visitor can start a session.
## Things to check before going live
List every site that will embed the widget. Without origins, third-party hosts cannot load config or mint tokens.
The widget uses the same web-call path as the assistant editor's test call — if that sounds right, the widget will too.
Browsers require HTTPS for microphone access. The host page must not block microphone via `Permissions-Policy`. Script/web-component embeds set `allow="microphone"` on the iframe automatically.
Voice conversations are processed like calls (transcripts, optional recording with consent flow). Mention the widget in your privacy policy.
## Troubleshooting
Confirm the embed snippet sits before the closing `` tag, hard-refresh (or test in a private window) to rule out cached HTML, check your plan includes the web widget, and look for JavaScript errors in the browser console. Copy the snippet fresh from the widget editor if you've since changed the connector's key.
* An empty allowlist does **not** mean “open to any site”: foreign origins are blocked. Only the platform domain itself stays allowed so the in-app live preview keeps working.
* Add every website host that will load the snippet before going live. If the widget fails to load on a customer site, check Allowed websites first.
## Customization
* **Display** — **Floating** (corner launcher) or **Inline** (in-page embed). Position and Initial state only apply to Floating.
* **Colors and branding** — launcher color, panel accent, logo; tenant branding applies automatically on white-label domains.
* **Position** — corner placement of the floating launcher (hidden for Inline).
* **Modes** — voice-only, chat-only, or both.
* **Voice presence** — classic audio visualizer, or a **virtual AI avatar** (see below).
* **Launcher icon** — Assistant orb, Chat bubbles, Question mark, Smiley face, Team, or Hand wave. Applies to chat-only, voice-only, and both. **Assistant avatar** is also available when the selected assistant has a profile picture. **Logo** uses the widget header logo.
* **Launcher label** — presets (**No text** default; Help, Ask anything, Assistance, Support, Live Chat, Need help?) translated from the visitor’s browser language. Avatar-only still uses optional custom launcher text for the glass CTA.
* **Texts** — welcome message, AI disclosure, privacy notice.
* **Pre-chat form** — optional form before chat or voice starts (see below).
## Virtual AI avatar
Virtual avatars require the AI Avatar feature. In the widget editor, set **Voice presence** to **AI avatar** and pick an avatar.
* **Layouts**
* **Avatar only (full-bleed)** — compact card focused on the face. Floating widgets can start **Expanded** or **Minimized**; Inline always shows the card in place.
* **Avatar + chat** — avatar presence with the classic chat/voice panel chrome.
* **Billing** — voice sessions bill the normal talk-minute rate, plus the **Web widget virtual avatar** surcharge per minute while a virtual avatar is active; plain text chat messages sent and received bill credits per message at the workspace's **Web chat (sent)** / **Web chat (received)** rate. Current rates are on the [Usage page](https://app.famulor.io/usage); see also [How usage is billed](/billing/minutes).
* Without AI Avatar access, the editor shows an upgrade option and the API rejects enabling avatar presence.
## Pre-chat form
Open the widget in the editor, go to the **Messages** tab, find **Pre-chat form**, and turn on **Enable**. Visitors then fill in fields before the session starts.
* **Suggestions** come from contact fields (name, email, phone), the selected assistant’s input variables, and workspace Audience attributes. You can also add custom keys.
* Submitted values become call **input variables** (`{{variable_key}}`), update the Audience lead when identity fields are present, and appear in **History** under Pre-chat form / Input variables.
* Required fields are validated before a visitor can start a session.
## Things to check before going live
List every site that will embed the widget. Without origins, third-party hosts cannot load config or mint tokens.
The widget uses the same web-call path as the assistant editor's test call — if that sounds right, the widget will too.
Browsers require HTTPS for microphone access. The host page must not block microphone via `Permissions-Policy`. Script/web-component embeds set `allow="microphone"` on the iframe automatically.
Voice conversations are processed like calls (transcripts, optional recording with consent flow). Mention the widget in your privacy policy.
## Troubleshooting
Confirm the embed snippet sits before the closing `` tag, hard-refresh (or test in a private window) to rule out cached HTML, check your plan includes the web widget, and look for JavaScript errors in the browser console. Copy the snippet fresh from the widget editor if you've since changed the connector's key.