> ## Documentation Index
> Fetch the complete documentation index at: https://docs.famulor.io/llms.txt
> Use this file to discover all available pages before exploring further.
# White Label Program
> What White Label access is, how customer workspaces are isolated, and how to support and manage your customers
White-label access lets an existing workspace operate as a branded reseller environment. Customers use your domain and branding while their assistants, calls, campaigns, plan, credits, and team remain isolated in separate customer workspaces.
White-label access comes either with a plan tier that includes it or as a standalone add-on bought from **Settings → Plan**. Unlike Fallbacks & Guardrails, Clone your own voice, and Revenue Autopilot, it can never be resold onward to your own customers.
## Customer locations
The **Workspace locations** map at the top of your reseller dashboard shows where your customer workspaces are based, using the country selected in each workspace’s settings. Each workspace counts once. Workspaces without a country appear under **Country not set (all time)**. The workspace count, country count, and top location above the map follow the selected period and count workspaces created during that period. The map and its country values continue to show all current customer workspaces. The map does not show visitor IP locations.
## What you can customise
* **Domain** — app, login, public API (`/api/v1`), and [MCP](/mcp/overview) use your verified domain.
* **Branding, logos, currency, legal pages, email, retention limits, and bot protection** — see [White Label Setup](/admin/whitelabel-setup) for the full walkthrough of every setting.
* **[Plans and pricing](/admin/plans-and-limits)** — customer-facing plans, included minutes, limits, and add-ons.
* **[Billing](/admin/stripe)** — customer checkout, subscriptions, top-ups, and invoices through your connected billing account.
White-label administration appears only when your workspace has White-label access.
## Customer workspaces
When a person registers on your white-label domain, Famulor creates a separate customer workspace owned by that person. The customer does not become a member of your reseller workspace.
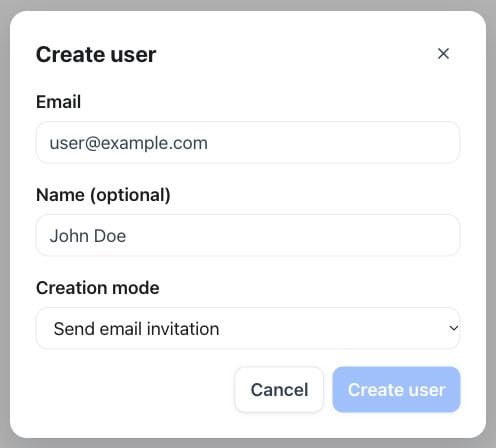
Open **Whitelabel Admin → Users → Create user**. Enter the customer email and optional name, choose **Creation mode**, and review the details before selecting **Create user**. The screenshot shows an unsaved form with example placeholders; no customer or invitation was created.
 This separation keeps customer resources, billing, credits, and team access independent. Manage customers from the **Whitelabel Admin** area or use the [White Label API](/admin/whitelabel-api) for your own onboarding and support workflows.
Open a single customer under **Users** to reach two override tools, both scoped to that one customer only:
* **Custom User Appearance** hides specific navigation pages or product features from that customer, independent of your global white-label branding and navigation.
* **Custom User Limits** overrides individual plan-limit values — such as the number of assistants or campaigns — for that one workspace. An override here takes priority over whatever the customer's subscribed plan specifies.
See [User Limits Management](/admin/user-limits) for the full picture, including the default limits every prepaid customer starts with before either override applies.
## Cross-customer history and live monitoring
Your admin console has its own **History** and **Live monitoring** views that aggregate every customer workspace into one place, so support and quality checks do not mean opening each workspace in turn. They are separate from the single-workspace [History](/monitoring/history) and [Live monitoring](/monitoring/live-monitoring) your customers use inside the product.
Admin History lists calls, email, and messaging conversations from every customer workspace in one grid, with a **Workspace** column identifying which customer each conversation belongs to, and opens the same detail views as the customer-facing History.
Admin Live monitoring shows the active calls across all your customer workspaces. On any of them you can listen in, whisper to the assistant, take over the conversation, or hang up — the same controls as a single workspace's own Live monitoring — alongside response-latency percentiles from the last 24 hours. This view is gated by your own reseller plan's **Live monitoring** capability, not by any individual customer's plan.
## Connect a custom domain
Open **Whitelabel Admin → Settings → Domains** and add the full hostname you want to use.
Open **Whitelabel Admin → Settings → Domains**, enter your hostname in **Custom domain**, then select **Add domain**. The screenshot shows the form before a domain has been added; the DNS records appear in the next step.
This separation keeps customer resources, billing, credits, and team access independent. Manage customers from the **Whitelabel Admin** area or use the [White Label API](/admin/whitelabel-api) for your own onboarding and support workflows.
Open a single customer under **Users** to reach two override tools, both scoped to that one customer only:
* **Custom User Appearance** hides specific navigation pages or product features from that customer, independent of your global white-label branding and navigation.
* **Custom User Limits** overrides individual plan-limit values — such as the number of assistants or campaigns — for that one workspace. An override here takes priority over whatever the customer's subscribed plan specifies.
See [User Limits Management](/admin/user-limits) for the full picture, including the default limits every prepaid customer starts with before either override applies.
## Cross-customer history and live monitoring
Your admin console has its own **History** and **Live monitoring** views that aggregate every customer workspace into one place, so support and quality checks do not mean opening each workspace in turn. They are separate from the single-workspace [History](/monitoring/history) and [Live monitoring](/monitoring/live-monitoring) your customers use inside the product.
Admin History lists calls, email, and messaging conversations from every customer workspace in one grid, with a **Workspace** column identifying which customer each conversation belongs to, and opens the same detail views as the customer-facing History.
Admin Live monitoring shows the active calls across all your customer workspaces. On any of them you can listen in, whisper to the assistant, take over the conversation, or hang up — the same controls as a single workspace's own Live monitoring — alongside response-latency percentiles from the last 24 hours. This view is gated by your own reseller plan's **Live monitoring** capability, not by any individual customer's plan.
## Connect a custom domain
Open **Whitelabel Admin → Settings → Domains** and add the full hostname you want to use.
Open **Whitelabel Admin → Settings → Domains**, enter your hostname in **Custom domain**, then select **Add domain**. The screenshot shows the form before a domain has been added; the DNS records appear in the next step.
 1. Publish the ownership TXT record shown in the setup.
2. Publish the recommended A or CNAME record for routing.
3. Wait for DNS propagation, then choose **Check DNS**.
The domain becomes active only after ownership, routing, and certificate checks succeed. Removing the domain disables sign-in and branding on that hostname.
The same workflow is available through `GET`, `POST`, and `DELETE /api/v1/custom-domain`, `POST /api/v1/custom-domain/verify`, and the matching MCP tools.
## Registration and prepaid accounts
Registration, prepaid access, welcome credits, and the default limits a prepaid customer starts with are all configured under **Whitelabel Admin → Default plan limits** — see [User Limits Management](/admin/user-limits) for the full breakdown, including the API and MCP tools for each setting.
## User view
Authorised reseller admins can open **User view** for one of their own customers to reproduce that customer's dashboard experience. A persistent banner identifies the customer and provides a clear return to the admin area. Each session is recorded in the audit history.
Use User view only for legitimate support and administration, and follow your organisation's access policy.
## Prompt templates
Build reusable starting points for your customers' assistants — see [Prompt Templates](/admin/prompt-templates).
## Voice catalog
Choose which voices from the platform catalog your customers can pick from in the assistant voice picker. Turn individual voices on or off in an allow-list, and add further voices to the catalog when a customer needs one that isn't listed yet.
A voice switched off further upstream carries an **Upstream** marker and cannot be turned back on from here. A voice whose text-to-speech source has been retired platform-wide is flagged separately on its row, so you can replace it on the affected assistants or delete it from the catalog.
## Moving customer resources
Reseller admins can move supported resources between their own customer accounts, for example when handing an agency-built setup to the final customer — see [Data Migration](/admin/data-migration) for what can be moved and how rollback works.
## Customer passwords and account emails
Open **Users → select customer → Account access** to send a password reset email or set a new password. Direct password changes are available only when the customer account is used exclusively within your brand. For accounts that also access another brand or platform workspace, send a reset email so the customer retains control of their global login.
Account emails use your verified domain, branding, and configured SMTP sender. This includes invitations, password recovery, email-change confirmations, verification codes, and enabled account-security notifications. Email changes may require confirmation from both the current and new address. A mail-server failure does not switch the sender to another brand. Check your SMTP settings if delivery fails.
This documentation is built and hosted on [Mintlify](https://mintlify.com), a developer documentation platform.
1. Publish the ownership TXT record shown in the setup.
2. Publish the recommended A or CNAME record for routing.
3. Wait for DNS propagation, then choose **Check DNS**.
The domain becomes active only after ownership, routing, and certificate checks succeed. Removing the domain disables sign-in and branding on that hostname.
The same workflow is available through `GET`, `POST`, and `DELETE /api/v1/custom-domain`, `POST /api/v1/custom-domain/verify`, and the matching MCP tools.
## Registration and prepaid accounts
Registration, prepaid access, welcome credits, and the default limits a prepaid customer starts with are all configured under **Whitelabel Admin → Default plan limits** — see [User Limits Management](/admin/user-limits) for the full breakdown, including the API and MCP tools for each setting.
## User view
Authorised reseller admins can open **User view** for one of their own customers to reproduce that customer's dashboard experience. A persistent banner identifies the customer and provides a clear return to the admin area. Each session is recorded in the audit history.
Use User view only for legitimate support and administration, and follow your organisation's access policy.
## Prompt templates
Build reusable starting points for your customers' assistants — see [Prompt Templates](/admin/prompt-templates).
## Voice catalog
Choose which voices from the platform catalog your customers can pick from in the assistant voice picker. Turn individual voices on or off in an allow-list, and add further voices to the catalog when a customer needs one that isn't listed yet.
A voice switched off further upstream carries an **Upstream** marker and cannot be turned back on from here. A voice whose text-to-speech source has been retired platform-wide is flagged separately on its row, so you can replace it on the affected assistants or delete it from the catalog.
## Moving customer resources
Reseller admins can move supported resources between their own customer accounts, for example when handing an agency-built setup to the final customer — see [Data Migration](/admin/data-migration) for what can be moved and how rollback works.
## Customer passwords and account emails
Open **Users → select customer → Account access** to send a password reset email or set a new password. Direct password changes are available only when the customer account is used exclusively within your brand. For accounts that also access another brand or platform workspace, send a reset email so the customer retains control of their global login.
Account emails use your verified domain, branding, and configured SMTP sender. This includes invitations, password recovery, email-change confirmations, verification codes, and enabled account-security notifications. Email changes may require confirmation from both the current and new address. A mail-server failure does not switch the sender to another brand. Check your SMTP settings if delivery fails.
This documentation is built and hosted on [Mintlify](https://mintlify.com), a developer documentation platform.